

Meet Caroline, AKA Caro. She is a talented and knowledgeable baker from whom we can all learn a lot!
Let’s take a look at her story:
What is your name and the name of your business/brand:
I am Caroline Ordukaya, known as Caro on social media and in the baking world. My website is Caroline’s Easy Baking Lessons.
Tell us your story:
After teaching myself to bake, I realized so many recipes are poorly written & setting you up for failure.
So in 2018, I decided to set up a free baking lessons website with detailed structured recipes & step-by-step process photos. Nearly four years on & I have reviewed dozens of recipes, added fondant tutorials and kids recipes, made video tutorials for my YouTube channel and transferred old content onto a new website & platform. My goal is to make baking easier for everyone so they, too, can experience the benefits of
baking from scratch.
I was approached to teach on a wellness learning site, so later in the year, I will be offering online live baking lessons so I can reach even more people & help them become the best possible baker they can be.
Can you share three of your top baking tips with us?
The fridge is your friend in baking. Use it to relax pastry dough right after forming the pastry, firm the butter & to prevent tough bakes. Use to prevent cookies from losing their shape or spreading on baking. Chill
(or freeze), your cakes before slicing for cleaner cuts & social media-ready pics! These are just three examples.
When weighing/measuring butter, roughly chop into small cubes (about 1cm, less than ½ ). Then leave out to soften & come to room temperature. Small cubes have a smaller surface area & will soften faster as well as
be easier to incorporate into your batter.
Make your own, less expensive cake release. Made from flour, oil & vegetable shortening. Store in the fridge anytime you need to grease. I highly recommend for bundt cakes.
What is your favorite cookbook, and why?
One of my favorite cookbooks is by Good Housekeeping. I have several of their books, but my favorite is an old one from 1984 that actually has some drawings/illustrations for the process stages. Lots
of photos in books, particularly at that time, could be quite costly to produce, so I think having simple black & white drawings is great. Process pics, I believe, should be standard in all recipes, so having those
always gains more points in my book. Excuse the pun! But it also covers a wide array of baking techniques, so a great book to have.
What is your favorite season?
I like the Spring/Summer period when more gorgeous fruits & summer berries become available. They make me think of creating great desserts. Less people bake in the summer. For some, the heat is
too much to turn the oven on.
Once Autumn/Fall comes, I begin to get excited about lots more baking &
using seasonal ingredients. However, baking at Christmas & New Year is probably the most special.
There is less emphasis on recipe development & testing. It becomes a time for gifting my handmade creations to the ones I love.
If you are ever unsure what to gift someone at any time of the year, bake for them from scratch. It will always mean so much more.
What do you enjoy baking during your favorite season?
I don’t have any specific favorite things to bake. It’s more a case of what I am in the mood for or craving.
At Christmas, I enjoy & look forward to eating my Chocolate Orange Yule Log. A lot easier to make than it looks, it tastes great & because of that, it never lasts long!
I also love using pumpkin & making my own puree to use in recipes. What I have been craving for lately & waiting for the season is fig
curd. I make the fig curd with some anise added & it is amazing! I was literally eating it every day, on some fruit bread, until it all finished. I did freeze some figs so I could make some more, but when I write up a
recipe & post online, I prefer to do so when the ingredients are in season & easily available. Now the time is right, so look out for that recipe soon.
Can you share a delicious recipe with us?
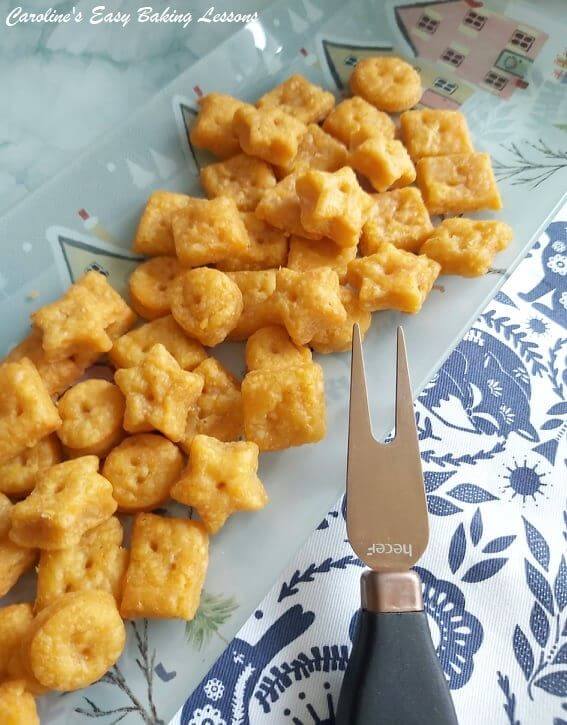
SMOKIN’ CHEEZEE SQUARES & STARS
Here’s my quick to prepare savory snack – Easy Peasy Smokin’ Cheezee Squares!
Not quite pastry, not quite a cracker, these cheesy snacks are great for entertaining, gifting, or nibbling on movie night.
Ingredients
226 grams Scottish Extra Mature Cheese (2¼ cup, 8 oz, Extra Sharp Cheddar, or any mature/sharp hard cheese.)
58 grams Butter, unsalted (½ stick, 2 oz, cubed. If using salted, omit salt)
126 grams Plain Flour (4½ oz, or 1 cup All-Purpose flour)
½ tsp Salt (omit if using salted butter)
1 tsp Smoked Paprika, non-spicy (or Mustard Powder)
½ tsp Garlic Powder (or Onion Powder/flakes)
3 tbsp Cold Water (45ml, 1½ fl oz, approx. You may need more)
Instructions
- Cube the butter & leave out a little to take the cold edge off (it doesn’t need to be soft). Meanwhile, gather the
ingredients. - Grate/shred the cheese & place all ingredients but the water into a food processor. Pulse until the mixture
resembles breadcrumbs. - Add in the cold water & pulse again until all combined.
The mixturesuddenly comes together in a ball, cleaning the sides of the bowl as it does. You might need a little more water, but
add in very small drops. - Tip the dough onto baking/parchment paper or cling film/plastic wrap & form into a disc or square/rectangular
shape. Wrap & put in the fridge for 1 hour. - Line your baking trays/sheets & heat the oven to 170°c/150°c Fan Oven/325°f/Gas Mark 3.
- On lightly floured baking/parchment paper, roll the dough to about ¼ in. or 6mm thickness.
- To cut squares by hand, use a knife to cut vertical strips, leaving a 1 inch/2½cm gap in-between. Then turn the paper & cut lines in the opposite direction to make 1inch/2½cm wide squares. Transfer the squares of dough to the prepared baking tray(s) & leave a little space in-between them. Roll out the excess dough & cut more squares. If using a
cookie or pastry cutter, dip in some flour & cut out as many shapes as you can. Then re-roll the excess dough & cut it out till all the dough is used. - Use a BBQ skewer to make 2 or 3 holes in the center of each square, going down about halfway. Place the
prepared cheese squares/shapes in the fridge until the oven is ready. - Bake in the oven for about 8 – 10 minutes, turning sheets/trays during baking to ensure an even bake. They will be
puffed up & when you are able to move them slightly, when gently pushed, take them out. - They will still be a little soft, so leave on the baking sheet/tray for at least 5 minutes before transferring to a cooling rack, paper-and-all.
- Eat when you can’t wait any longer and store in a tin or airtight container (if there is any left, that is!)

Where can we find you on social media?
Website: https://easyonlinebakinglessons.com
Twitter: https://twitter.com/Online_Baking
Facebook Page: https://www.facebook.com/carolineseasybakinglessons/
Instagram: https://www.instagram.com/carolines_easy_baking_lessons/
YouTube: https://www.youtube.com/channel/UCuW4mtZHE4Gl3ttIaVfn-pg
Pinterest: https://www.pinterest.co.uk/carolineordukaya/
Facebook Profile: https://www.facebook.com/caroline.ordukaya

4 responses to “Baker Interview: Caroline Ordukaya”
Cool recipe and great interview!
LikeLike
Thank you! That means a lot coming from the world’s best interviewer!
LikeLike
Aww thanks so much for interviewing and featuring me on your new website Deanna! I appreciate it so much and for your Facebook groups.
LikeLike
It’s my pleasure!
LikeLike